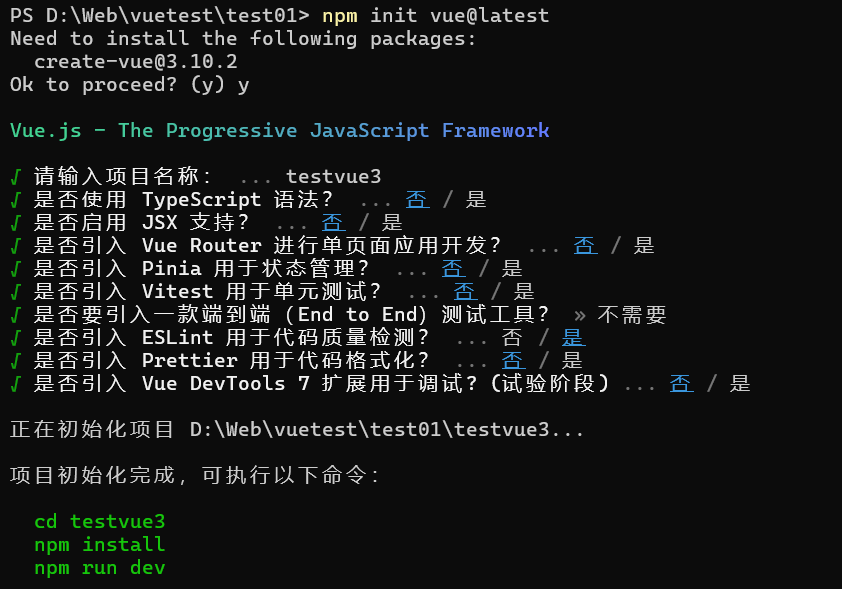
create-vue 创建项目
create-vue 是Vue官方新的脚手架工具,底层切换到了 vite (下一代前端工具链),为开发提供极速响应
- 需要安装 16.0 或更高版本的 Node.js

- 使用指令创建一个 Vue3 项目(居然是中文提示)
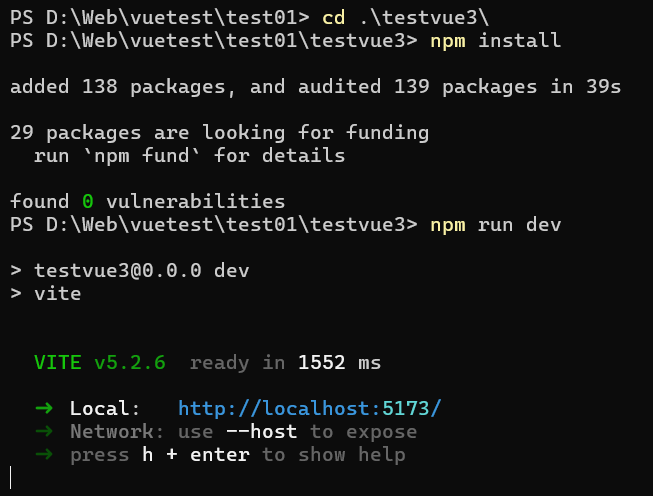
- 安装依赖,运行项目
1
2
3
| 在项目目录下
npm install
npm run dev
|
项目目录
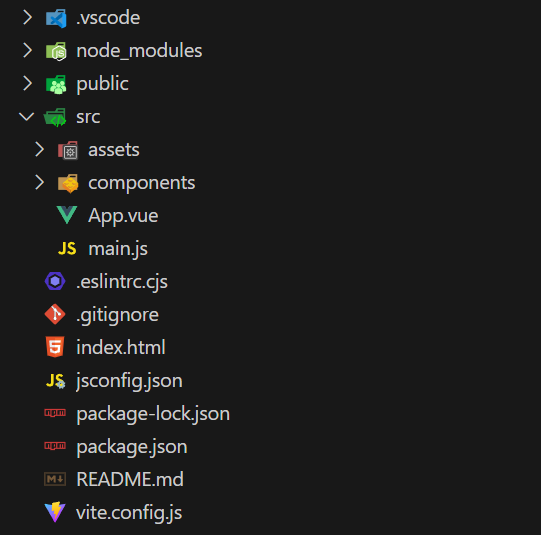
关键文件:
- vite.config.js :项目的配置文件,基于 vite 的配置
- package.json :项目包文件,核心依赖项变成了 Vue3.x 和 vite
- main.js :入口文件,createApp 函数创建应用实例
1
2
3
4
5
6
| import './assets/main.css'
import { createApp } from 'vue'
import App from './App.vue'
createApp(App).mount('#app')
|
- app.vue :根组件,SFC单文件组件 script - template - style
变化:
- 脚本 script 和模板 template 顺序调整
- 模板 template 不在要求唯一根元素
- 脚本 script 添加 setup 标识支持组合式API
1
2
3
4
5
6
7
8
9
10
11
12
13
14
15
16
17
18
19
20
21
22
| <script setup>
import HelloWorld from './components/HelloWorld.vue'
import TheWelcome from './components/TheWelcome.vue'
</script>
<template>
<header>
<img alt="Vue logo" class="logo" src="./assets/logo.svg" width="125" height="125" />
<div class="wrapper">
<HelloWorld msg="You did it!" />
</div>
</header>
<main>
<TheWelcome />
</main>
</template>
<style scoped>
...
</style>
|
- index.html :单页入口,提供 id 为 app 的挂载点
1
2
3
4
5
6
7
8
9
10
11
12
13
| <!DOCTYPE html>
<html lang="en">
<head>
<meta charset="UTF-8">
<link rel="icon" href="/favicon.ico">
<meta name="viewport" content="width=device-width, initial-scale=1.0">
<title>Vite App</title>
</head>
<body>
<div id="app"></div>
<script type="module" src="/src/main.js"></script>
</body>
</html>
|
组合式 API
setup 选项
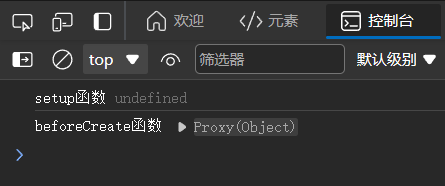
- 执行时机,比 beforeCreate 还要早
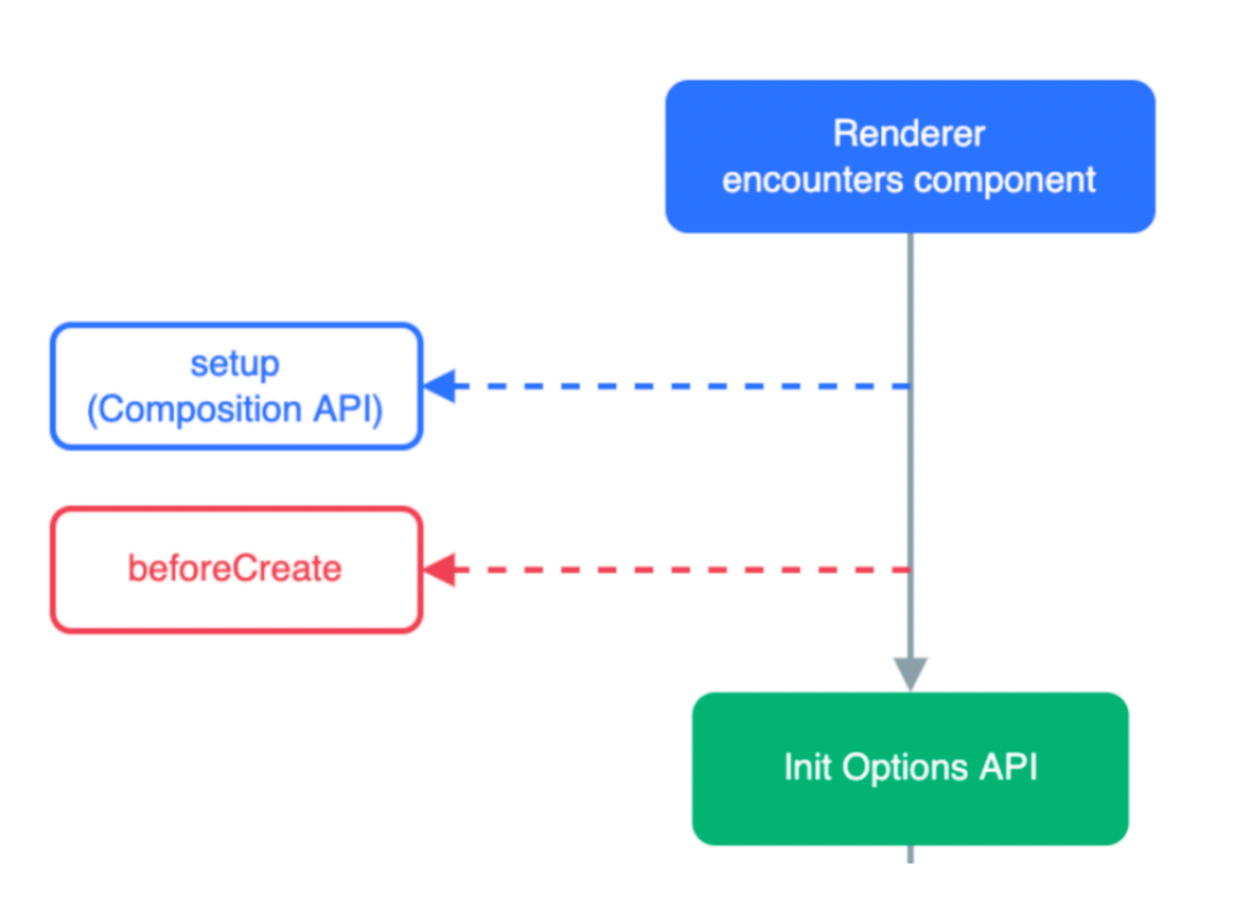
- setup 函数,由于太早执行,所有获取不到this,得到的是 undefined
1
2
3
4
5
6
7
8
9
10
| <script>
export default {
setup () {
console.log('setup函数', this)
},
beforeCreate () {
console.log('beforeCreate函数', this);
}
}
</script>
|
- 在 setup 中定义的函数和数据,必须在 return 中返回才能被模板使用
1
2
3
4
5
6
7
8
9
10
11
12
13
14
15
16
17
18
19
| <script>
export default {
setup () {
const message = 'Hello Vue3'
const printMsg = () => {
console.log(message);
}
return {
message,
printMsg
}
}
}
</script>
<template>
<div>{{ message }}</div>
<button @click="printMsg">打印</button>
</template>
|
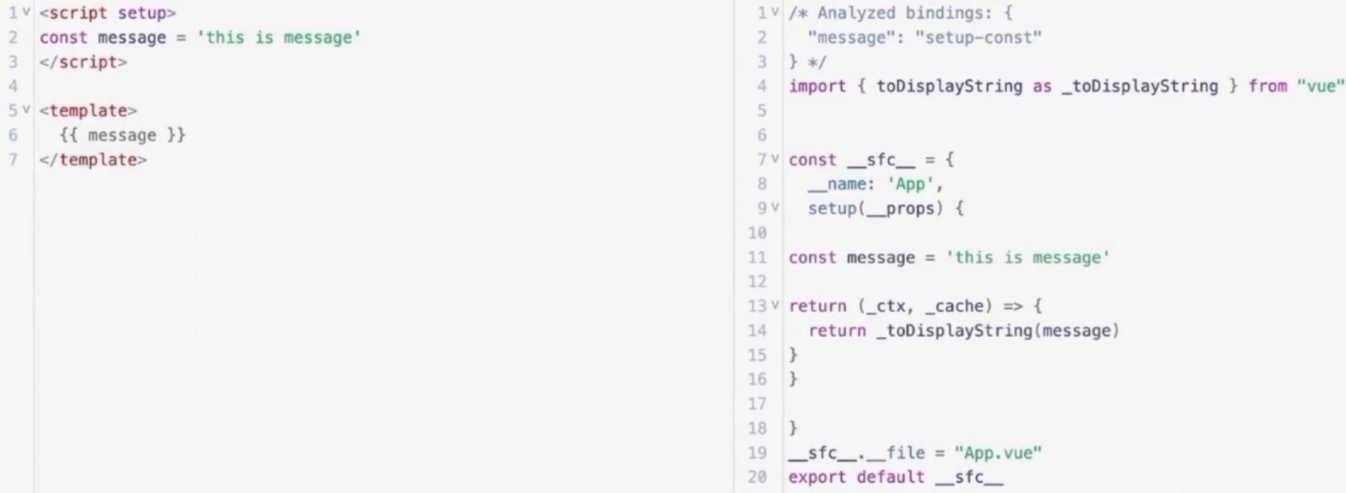
语法糖写法:
在 script 标签内加入 setup,顶层的绑定会被暴露给模板,实现代码的简化
1
2
3
4
5
6
7
8
9
10
11
| <script setup>
const message = 'Hello Vue3'
const printMsg = () => {
console.log(message);
}
</script>
<template>
<div>{{ message }}</div>
<button @click="printMsg">打印</button>
</template>
|
原理:
reactive 和 ref 函数
reactive():
作用:接受对象类型数据的参数传入并返回一个响应式的对象
- 从 vue 包中导入 reactive 函数
- 在
<script setup> 中执行 reactive 函数并传入类型为对象的初始值,并使用变量接收返回值
1
2
3
4
5
6
7
8
9
10
11
12
13
14
| <script setup>
import { reactive } from 'vue';
const state = reactive({
count: 100
})
const setCount = () => {
state.count++
}
</script>
<template>
<div>{{ state.count }}</div>
<button @click="setCount">+1</button>
</template>
|
ref():
作用:接受简单类型或者对象类型的数据传入并返回一个响应式的对象
- 从 vue 包中导入 ref 函数
- 在
<script setup> 中执行 ref 函数并传入初始值,并使用变量接收返回值
- 在脚本 script 当中调用需要 .value ,在模块中则直接调用
1
2
3
4
5
6
7
8
9
10
11
12
| <script setup>
import { ref } from 'vue';
const state = ref(100)
const setCount = () => {
state.value++
}
</script>
<template>
<div>{{ state }}</div>
<button @click="setCount">+1</button>
</template>
|
对比:
- reactive 不能处理简单类型的数据
- ref 参数类型支持更好但是必须通过 .value 访问修改
- ref 函数的内部实现依赖于 reactive 函数
- 实际开发推荐使用 ref
computed 计算属性函数
写法和 Vue2 一样,组合式API中的计算属性只是修改了写法
- 导入 computed 函数
- 执行函数,在回调参数中 return 基于响应式数据做计算的值,用变量接收
1
2
3
4
5
6
7
8
9
10
11
12
13
14
15
16
| <script setup>
import { ref, computed } from 'vue';
const list = ref([1, 2, 3, 4, 5, 6, 7, 8])
const comList = computed(() => {
return list.value.filter(item => item % 2 === 0)
})
const addFn = () => {
list.value.push(list.value[list.value.length-1]+1)
}
</script>
<template>
<div>原始数组:{{ list }}</div>
<div>筛选数组:{{ comList }}</div>
<button @click="addFn">+1</button>
</template>
|
注意:
- 计算属性中,不能出现异步请求/修改DOM等操作
- 计算属性为只读,特殊情况可以使用 get 、set
watch 侦听器
作用:侦听一个或者多个数据的变化,数据变化时执行回调函数
额外参数:
- immediate:在侦听器被创建时就立刻执行
- deep:侦听的深浅程度,默认是浅度侦听,只能侦听简单数据,设为 true 则为深度侦听,可以侦听复杂数据
步骤:
- 导入 watch 函数
- 执行 watch 函数传入要侦听的响应式数据( ref 数据)和回调函数
- 可以同时侦听多个响应式数据的变化,以数组的形式传入和获取
1
2
3
4
5
6
7
8
9
10
11
12
13
14
15
16
17
18
19
20
21
22
| <script setup>
import { ref, watch } from 'vue';
const man = ref({
name: 'Alien',
age: 18
})
const grow = () => {
man.value.age++
}
watch(man, (newValue) => {
console.log(`现在是${newValue.age}岁`)
},{
immediate: true,
deep: true
})
</script>
<template>
<div>有位靓仔:{{ man.name }}</div>
<div>现在年龄:{{ man.age }}</div>
<button @click="grow">+1</button>
</template>
|
生命周期函数
Vue3 的生命周期函数有选项式和组合式两种:
| 选项式API |
组合式API |
| beforeCreate / created |
setup |
| beforeMount |
onBeforeMount |
| mounted |
onMounted |
| beforeUpdate |
onBeforeUpdate |
| updated |
onUpdated |
| beforeUnmount |
onBeforeUnmount |
| unmounted |
onUnmounted |
步骤:
- 导入生命周期函数
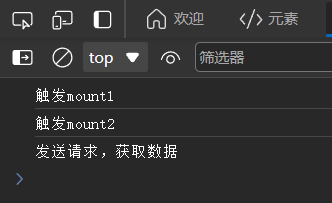
- 执行生命周期函数,传入回调函数
- 生命周期函数可以执行多次,多次执行时传入的回调会在时机成熟时依次执行
1
2
3
4
5
6
7
8
9
10
11
12
13
14
15
| <script setup>
import { onMounted } from 'vue';
const getList = () => {
setTimeout(() => {
console.log('发送请求,获取数据');
}, 2000)
}
getList()
onMounted(() => {
console.log('触发mount1');
})
onMounted(() => {
console.log('触发mount2');
})
</script>
|
父子通信
父传子:
- 父组件中给子组件绑定属性
- 子组件内部通过 props 选项接收
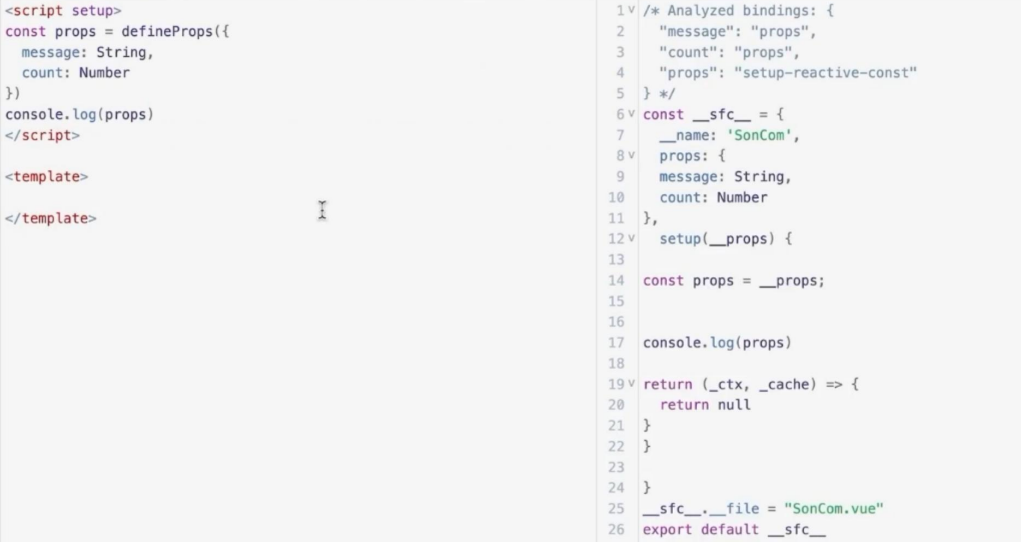
- 通过 defineProps ”编译器宏“ 接收子组件传递的数据
1
2
3
4
5
6
7
8
9
10
11
12
13
14
15
16
17
18
19
20
|
<script setup>
import sonCom from '@/components/son-com.vue'
</script>
<template>
<sonCom message="Xiaomi SU7"></sonCom>
</template>
<script setup>
const props = defineProps({
message: String
})
console.log(props);
</script>
<template>
<div>{{ message }}</div>
</template>
|
defineProps 原理:就是编译阶段的一个标识,实际编译器解析时,遇到后会进行编译转换
子传父:
- 父组件中给子组件标签通过 @绑定事件
- 子组件内部通过 emit 方法触发事件
- 通过 defineEmits 编译器宏生成 emit 方法
1
2
3
4
5
6
7
8
9
10
11
12
13
14
15
16
17
18
19
20
21
22
23
24
25
26
27
28
29
30
|
<script setup>
import sonCom from '@/components/son-com.vue'
import { ref } from 'vue';
const car = ref("Xiaomi SU7")
const addMessage = (Msg) => {
car.value = car.value + Msg
}
</script>
<template>
<sonCom :message=car @add-message="addMessage"></sonCom>
</template>
<script setup>
const props = defineProps({
message: String
})
console.log(props);
const emit = defineEmits(['addMessage'])
const sendMsg = () => {
emit('addMessage', '大卖!')
}
</script>
<template>
<div>{{ message }}</div>
<button @click="sendMsg">祝贺</button>
</template>
|
模板引用
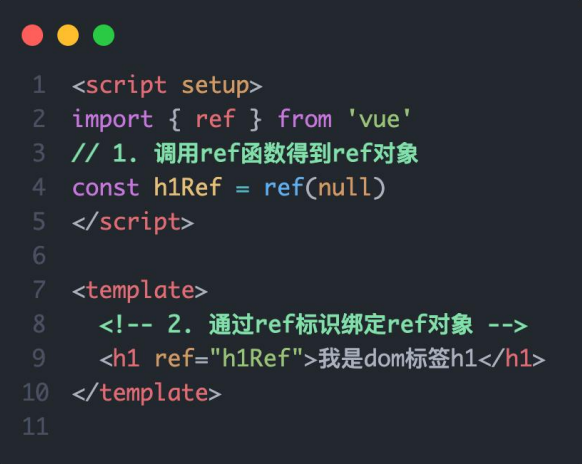
引用 DOM 或者组件时,使用 ref 函数获取
使用:
- 调用 ref 函数生成一个 ref 对象
- 通过 ref 标识绑定 ref 对象到标签
- 组件的属性和方法通过 defineExpose 编译宏指定允许父组件访问
1
2
3
4
5
6
7
8
9
10
11
12
13
14
15
16
17
18
19
20
21
22
23
24
25
26
27
28
29
30
31
32
33
34
35
36
37
38
39
40
41
|
<script setup>
import sonCom from '@/components/son-com.vue'
import { ref } from 'vue';
const car = ref("Xiaomi SU7")
const addMessage = (Msg) => {
car.value = car.value + Msg
}
const inp = ref(null)
const getCount = () => {
console.log(inp.value.count);
}
</script>
<template>
<sonCom :message=car @add-message="addMessage" ref="inp"></sonCom>
<button @click="getCount">获取次数</button>
</template>
<script setup>
import { ref } from 'vue';
const props = defineProps({
message: String
})
console.log(props);
const emit = defineEmits(['addMessage'])
let count = ref(0)
const sendMsg = () => {
emit('addMessage', '大卖!'),
count.value++
}
defineExpose({
count
})
</script>
<template>
<div>{{ message }}</div>
<button @click="sendMsg">祝贺</button>
</template>
|
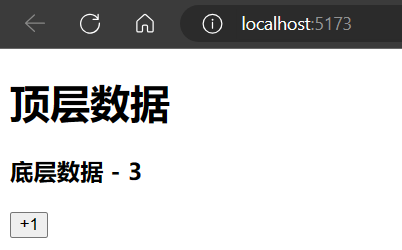
provide 和 inject
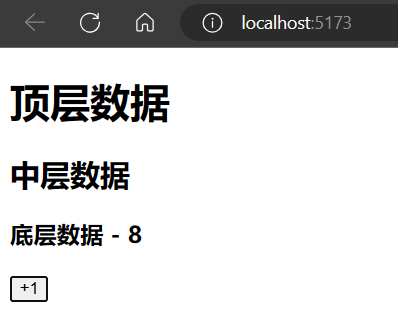
- 顶层组件通过 provide 函数提供数据(可以是简单数据、ref 对象、函数)
- 底层组件通过 inject 函数获取数据和方法
例如:以下代码实现顶层提供数据给底层,并提供修改数据的方法(底层不能直接修改顶层的数据,可以通过传递方法的方式修改)
1
2
3
4
5
6
7
8
9
10
11
12
13
14
15
16
17
18
19
20
21
22
23
24
25
26
27
28
29
30
31
32
33
34
35
|
<script setup>
import middleCom from '@/components/middleCom.vue'
import { provide, ref } from 'vue';
const count = ref(0)
provide('count', count)
provide('addCount', () => {
count.value++
})
</script>
<template>
<h1>顶层数据</h1>
<middleCom></middleCom>
</template>
<script setup>
import bottomCom from './bottomCom.vue'
</script>
<template>
<h2>中层数据</h2>
<bottomCom></bottomCom>
</template>
<script setup>
import { inject } from 'vue';
const num = inject('count')
const addNum = inject('addCount')
</script>
<template>
<h3>底层数据 - {{ num }}</h3>
<button @click="addNum">+1</button>
</template>
|
Vue3.3 新特性
defineOptions
在以下的代码中,写了两个script标签,一个标签写Composition API代码,一个标签以Options API的方式配置组件名,虽然可以配置组件名,但是这种处理方式很不好
1
2
3
4
5
6
7
8
9
10
| <script setup>
</script>
<script>
export default {
name: 'ComponentName'
}
</script>
<template>
<div>Com Component</div>
</template>
|
所以在 Vue 3.3 中新引入了 defineOptions 宏。顾名思义,主要是用来定义 Options API 的选项。可以用 defineOptions 定义任意的选项, props, emits, expose, slots 除外(因为这些可以使用 defineXXX 来做到)
1
2
3
4
5
6
7
8
9
| <script setup>
defineOptions({
name: 'ComponentName'
})
</script>
<template>
<div>Com Component</div>
</template>
|
defineModel
在Vue3中,自定义组件上使用v-model, 相当于传递一个modelValue属性,同时触发 update:modelValue 事件

不要 props,也不用 emit 直接用defineModel()
1
2
3
4
5
6
7
8
9
10
11
12
13
14
15
16
17
18
19
20
21
22
23
24
25
26
27
28
29
|
<script setup>
import bottomCom from '@/components/bottomCom.vue'
import { ref } from 'vue';
const count = ref(0)
</script>
<template>
<h1>顶层数据</h1>
<bottomCom v-model="count"></bottomCom>
</template>
<script setup>
import { defineModel } from 'vue';
const modelValue = defineModel()
console.log(modelValue);
</script>
<template>
<h3>底层数据 - {{ modelValue }}</h3>
<button @click="modelValue++">+1</button>
</template>
|