XMLHttpRequest
定义:XMLHttpRequest(XHR)对象用于与服务器交互。通过XMLHttpRequest可以在不刷新页面的情况下请求特定URL,获取数据。这允许网页在不影响用户操作的情况下,更新页面的局部内容。XMLHttpRequest在AJAX编程中被大量使用
关系:axios内部采用XMLHttpRequest与服务器交互

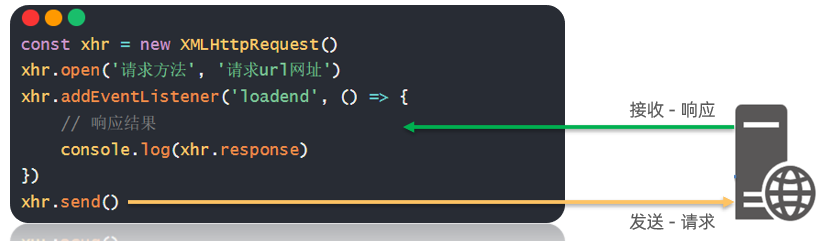
基本使用
- 创建 XMLHttpRequest 对象
- 配置请求方法和请求 url 地址
- 监听 loadend 事件,接收响应结果
- 发起请求
1
2
3
4
5
6
7
8
| const xhr = new XMLHttpRequest()
xhr.open('GET', 'http://hmajax.itheima.net/api/province')
xhr.addEventListener('loadend', () => {
console.log(xhr.response)
const data = JSON.parse(xhr.response)
document.querySelector('.city').innerHTML = data.list.join(' ')
})
xhr.send()
|
查询参数
定义:浏览器提供给服务器的额外信息,让服务器返回浏览器想要的数据
语法:http://xxxx.com/xxx/xxx?参数名1=值1&参数名2=值2
1
2
3
4
5
6
7
8
| const xhr = new XMLHttpRequest()
xhr.open('GET', 'http://hmajax.itheima.net/api/city?pname=广东省')
xhr.addEventListener('loadend', () => {
console.log(xhr.response)
const data = JSON.parse(xhr.response)
document.querySelector('.city').innerHTML = data.list.join(' ')
})
xhr.send()
|
数据提交
需求:通过 XHR 提交用户名和密码,完成注册功能
核心:
请求头设置 Content-Type:application/json
请求体携带 JSON 字符串
1
2
3
4
5
6
7
8
9
10
11
12
| const xhr = new XMLHttpRequest()
xhr.open('POST', 'http://hmajax.itheima.net/api/register')
xhr.addEventListener('loadend', () => {
console.log(xhr.response)
})
xhr.setRequestHeader('Content-Type', 'application/json')
const user = {
username: 'Alien12345',
password: '123456789'
}
const userStr = JSON.stringify(user)
xhr.send(userStr)
|

Promise
定义:Promise 对象用于表示一个异步操作的最终完成(或失败)及其结构值
1
2
3
4
5
6
7
8
9
10
11
12
|
const p = new Promise((resolve, reject) => {
})
p.then(result => {
}).catch(error => {
})
|
好处:
- 逻辑更清晰
- 了解axios函数内部运作机制
- 能解决回调函数地狱问题
Promise-三种状态
作用:了解Promise对象如何关联的处理函数,以及代码执行顺序
概念:一个Promise对象,必然处于以下几种状态之一
- 待定(pending) :初始状态,既没有被兑现,也没有被拒绝
- 已兑现(fulfilled) :意味着,操作成功完成
- 已拒绝(rejected) :意味着,操作失败
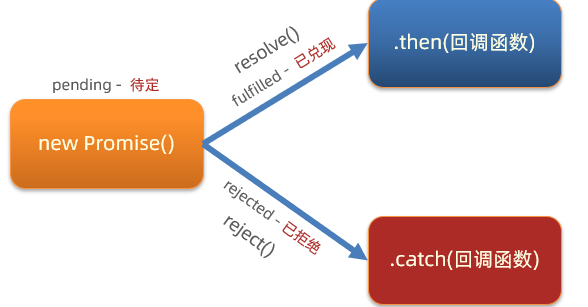
- 当
Promise对象一旦被兑现/拒绝,就是被敲定,状态无法再被改变
封装简易axios
了解封装axios的原理,可以更好地理解XMLHttpRequest原理和axios的用法
步骤:
- 定义
myAxios 函数,接收配置对象,返回 Promise 对象
- 发起 XHR 请求,默认请求方法为
GET
- 调用成功/失败的处理程序
- 使用
myAxios 函数,发起网络请求
1
2
3
4
5
6
7
8
9
10
11
12
13
14
15
16
17
18
19
20
21
22
23
24
25
|
function myAxios(config) {
return new Promise((resolve, reject) => {
const xhr = new XMLHttpRequest()
xhr.open(config.method || 'GET', config.url)
xhr.addEventListener('loadend', () => {
if (xhr.status >= 200 && xhr.status < 300) {
resolve(JSON.parse(xhr.response))
} else {
reject(new Error(xhr.response))
}
})
xhr.send()
})
}
myAxios({
url: '目标资源地址'
}).then(result => {
}).catch(error => {
})
|