基础通知
应用可以通过通知接口发送通知消息,提醒用户关注应用中的变化。用户可以在通知栏查看和操作通知内容。
- 导入notification模块
1
| import notificationManager from '@ohos.notificationManager'
|
- 发送通知
1
2
3
4
5
6
7
8
9
10
11
|
let request: notificationManager.NotificationRequest = {
id: 10,
content: {
}
}
notificationManager.publish(request)
.then(() => console.log('发送成功'))
.catch(reason => console.log('发送失败', JSON.stringify(reason)))
|
- 取消通知
1
2
3
4
|
notificationManager.cancel(10)
notificationManager.cancelAll()
|
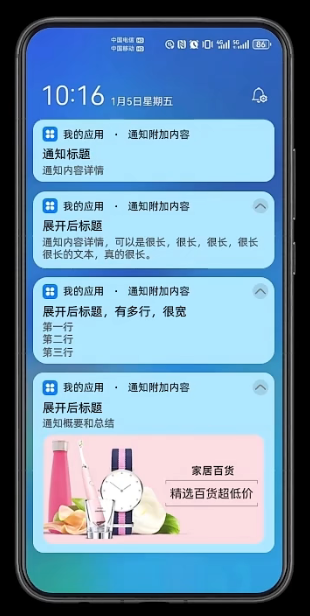
通知类型
通知的类型分为四种,其中后面三种为需展开的显示方式。
| 类型枚举 |
说明 |
| NOTIFICATION_CONTENT_BASIC_TEXT |
普通文本型 |
| NOTIFICATION_CONTENT_LONG_TEXT |
长文本型 |
| NOTIFICATION_CONTENT_MULTILINE |
多行文本型 |
| NOTIFICATION_CONTENT_PICTURE |
图片型 |
1
2
3
4
5
6
7
8
9
10
11
12
13
14
15
16
17
18
19
20
21
22
23
24
25
26
27
28
29
30
31
32
33
34
35
36
37
38
39
40
41
42
43
44
45
46
47
48
49
50
51
52
53
54
55
56
57
58
59
60
61
|
content: {
contentType: notificationManager.ContentType.NOTIFICATION_CONTENT_BASIC_TEXT,
normal: {
title: '通知标题',
text: '通知内容详情',
additionalText: '通知附加内容'
}
}
content: {
contentType: noticationManager.ContentType.NOTIFICATION_CONTENT_LONG_TEXT,
longText: {
title: '通知标题',
text: '通知内容详情',
additionalText: '通知附加内容',
longText: '通知中的长文本,我很长,我很长,我很长...',
briefText: '通知概要和总结',
expandedTitle: '通知展开时的标题'
}
}
content: {
contentType: noticationManager.ContentType.NOTIFICATION_CONTENT_MULTILINE,
multiline: {
title: '通知标题',
text: '通知内容详情',
additionalText: '通知附加内容',
briefText: '通知概要和总结',
longTitle: '展开时的标题,有多行,很宽',
lines: [
'第一行',
'第二行',
'第三行',
'第四行',
]
}
}
content: {
contentType: noticationManager.ContentType.NOTIFICATION_CONTENT_PICTURE,
picture: {
title: '通知标题',
text: '通知内容详情',
additionalText: '通知附加内容',
briefText: '通知概要和总结',
expandedTitle: '展开后的标题',
picture: this.pixel
}
}
async aboutToAppear() {
let rm = getContext(this).resourceManager;
let file = await rm.getMediaContent($r('app.media.xxx'))
image.createImageSource(file.buffer).createPixelMap()
.then(value => this.pixel = value)
.catch(reason => console.log('testTag', '加载图片异常', JSON.stringify(reason)))
}
|
1
2
3
4
5
6
7
8
9
10
11
12
13
14
15
16
|
let request: notificationManager.NotificationRequest = {
id: this.idx ++,
content: {
contentType: notificationManager.ContentType.NOTIFICATION_CONTENT_BASIC_TEXT,
normal: {
title: '普通通知' + this.idx,
text: '普通通知内容',
additionalText: '通知附加内容'
}
},
deliveryTime: new Date().getTime(),
showDeliveryTime: true,
groupName: 'WeChat',
slotType: notificationManager.SlotType.SOCIAL_COMMUNICATION
}
|
| 类型枚举 |
说明 |
状态栏图标 |
提示音 |
横幅 |
| SOCIAL_COMMUNICATION |
社交类型 |
✓ |
✓ |
✓ |
| SERVICE_INFORMATION |
服务类型 |
✓ |
✓ |
X |
| CONTENT_INFORMATION |
内容类型 |
✓ |
X |
X |
| OTHER_TYPES |
其他 |
X |
X |
X |
进度条通知
进度条通知会展示一个动态的进度条,主要用于文件下载、长任务处理的进度显示。
- 判断当前系统是否支持进度条模板
1
2
3
4
5
6
| let isSupport = await notify.isSupportTemplate('downloadTemplate')
if(!this.isSupport){
return
}
|
- 定义通知请求
1
2
3
4
5
6
7
8
9
10
11
12
13
14
15
16
17
18
19
20
21
22
23
24
25
26
|
let template = {
name: 'downloadTemplate',
data: {
progressValue: this.progressValue,
progressMaxValue: this.progressMaxValue
}
}
let request: notify.NotificationRequest = {
id: this.notificationId,
template: template,
wantAgent: this.wantAgentInstance,
content: {
contentType: notify.ContentType.NOTIFICATION_CONTENT_BASIC_TEXT,
normal: {
title: this.filename + ': ' + this.state,
text: '',
additionalText: this.progressValue + '%'
}
}
}
notify.publish(request)
.then(() => console.log('test', '通知发送成功'))
.catch(reason => console.log('test', '通知发送失败!', JSON.stringify(reason)))
|
- 在每一次任务进度变更都发送一次通知,实现进度条的变化,所有id不能变
通知意图
我们可以给通知或其中的按钮设置的行为意图(Want), 从而实现拉起应用组件或发布公共事件等能力。
1
2
3
4
5
6
7
8
9
10
11
12
13
14
15
16
17
18
19
20
21
22
23
24
25
26
27
|
let wantInfo: wantAgent.WantAgentInfo = {
wants: [
{
device: '',
bundleName: 'com.example.myapplication',
abilityName: 'EntryAbility',
action: '',
entities: []
}
],
requestCode: 0,
operationType: wantAgent.OperationType.START_ABILITY,
wantAgentFlags: [wantAgent.WantAgentFlags.CONSTANT_FLAG]
}
this.wantAgentInstance = await wantAgent.getWantAgent(wantInfo)
let request: notify.NotificationRequest = {
id: this.notificationId,
template: template,
wantAgent: this.wantAgentInstance,
content: {
}
}
|